Will Open Book Energy Scores Change the Game?
A major shift in the way homes are listed may boost home buyer interest in home performance. I say could, because it’s too soon to tell. As of February 2016, about nine states have added Home Energy Ratings to real estate MLS listings. This means that homebuyers can now make an “apples-to-apples” comparison of a home’s energy performance, as it relates to future energy use.
In addition, several states have now added a HERS Index Score Target (details) to their residential energy codes. For builders, this is actually good news, because it provides a clear benchmark that can be discussed with clients. It’s also a way to compare a new home’s energy performance with that of an existing home owned by a neighbor, an important strategy, as we’ll see below.
The new MLS HERS info is likely to affect home resale (and initial value for new homes). According to Resnet, “the Appraisal Journal documented that the market value of a home increases $20 for every $1 decrease in the annual energy costs. According to a recent analysis by the Pacific Northwest National Laboratory, building a home to exceed the Model Energy Code would result in an annual savings of $170 to $425. Applying these findings to the analysis published in the Appraisal Journal would equate to an increased home market value of between $4,250 to $10,625.”
If better energy efficiency raises home values, poor energy scores are likely to have the opposite effect. Will these new pressures drive buyer interest in high-performance housing? Possibly, but just how much is still anybody’s guess.
An Industry-Wide Challenge
Selling complex ideas such as building systems, and high-performance housing is tough. The psychology of energy conservation, and the factors that influence it, are often confusing and unpredictable. In other words, don’t blame yourself if your sustainable message isn’t getting through. It’s a human nature thing. Here’s what ScienceDirect says on the topic:
“Unnecessary complexity and sensory overload should be avoided by framing messages in a clear, concise and comprehensible format. In terms of relaying information to consumers, keeping things short and simple is essential for effective communication” (Source)
One successful approach to increasing consumer engagement in sustainability is the so called “normative” effect. That’s a nice way to say comparing them with their neighbors. Few factors have proven more effective at getting people to change their energy- or water-wasting behavior than letting them know their neighbor is more frugal, more clever.
Put all the research and trends together, and you can see that the most direct path to high-performance homebuyers proceeds directly through their trusted homebuilder and/or architect, who has to tell a good story, a story that invokes the client’s neighbors and peers, with a good solid push from new regulations and mandatory energy ratings.
Some aspects of homebuilding haven’t changed in decades, especially at the high-end of the market. Back in the early ’90s, as editor of Custom Builder magazine, I remember the horror stories of legally embattled builders. One wealthy client refused to pay a half-million dollar invoice because of a sticky door. Another demanded that every wall be torn out, when the faux-Italian wall surfacing didn’t meet her expectations. This kind of focus on aesthetics has been the norm at the high end for many years, but today’s builders face clientele who have reams of building science information available.

HERS Index ratings offer the possibility of comparing a new home’s predictive performance with that of nearby neighbors.
Who’s Buying Now?
The average sale price for a new house sold in January 2016 was $365,700, well beyond the means of a first-time buyer. (Source, U.S. Census). At the same time, the demand for secondary and vacation homes is booming. In 2014, for example, the National Association of Realtors 2015 Investment and Vacation Home Buyers Survey, showed that vacation-home sales (new and existing combined) hit about 1.13 million, the highest number since NAR began the survey in 2003.
So while some of the middle class is still shopping new homes, the new home buyer demographic skews wealthier, better educated and better informed than the average American. And studies have shown that higher income correlates with much greater use of the Internet, smartphones and other technology.
A couple of years ago, Google and the NAR did an analysis of how people shop online for new homes. They found that use of online searching has skyrocketed over the last few years. More recent research shows that reliance on the Internet declines by age group. The NAR reported that in 2015, “94 percent of millennials and 84 percent of baby boomers used online websites in their home search, only 65 percent of the Silent Generation—those ages 69 to 89 years—did the same. Older boomers, those aged 60 to 68 years, used a mobile device to search for properties at less than half the rate of millennials (30 percent versus 66 percent)”.Another interesting aspect of the digital home search is timing. Millennial buyers tend to spend 11 weeks researching before they buy. Older groups research less, and buy sooner.
What these numbers boil down to is a fundamental change in how homes are sold today. Instead of a “push” market, where builders call the shots, offer up a limited palette of designs and amenities, homeowners often come to the table with a detailed wish list of products, features and even floorplans.
The Search Pyramid: 1. Brand, 2. Category, 3. Everything Else.
But just how “deep” does consumer knowledge go? We know (from search data) that cosmetic issues still dominate the conversation: square footage, countertop material, floors and finishes. But how much are buyers delving into behind-the-walls terms, such as HVAC performance, insulation, window quality or attic venting?
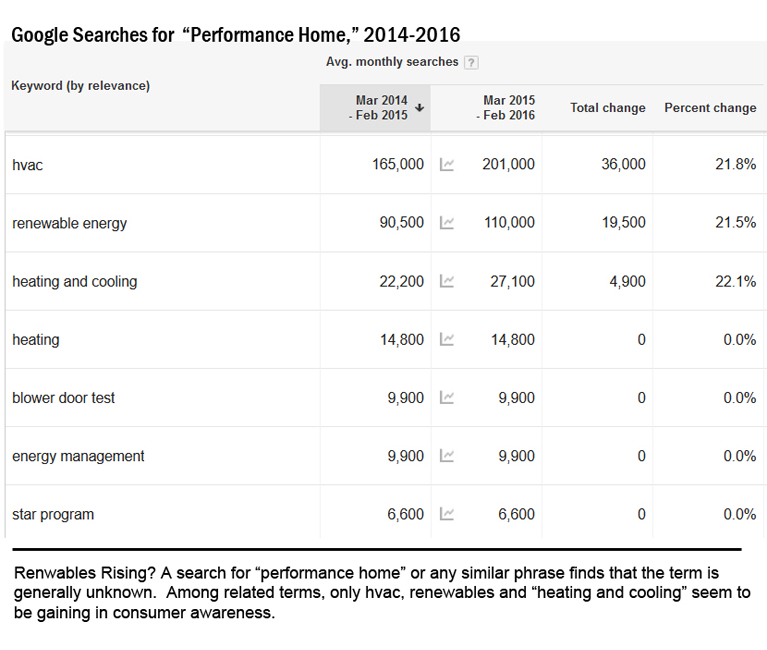
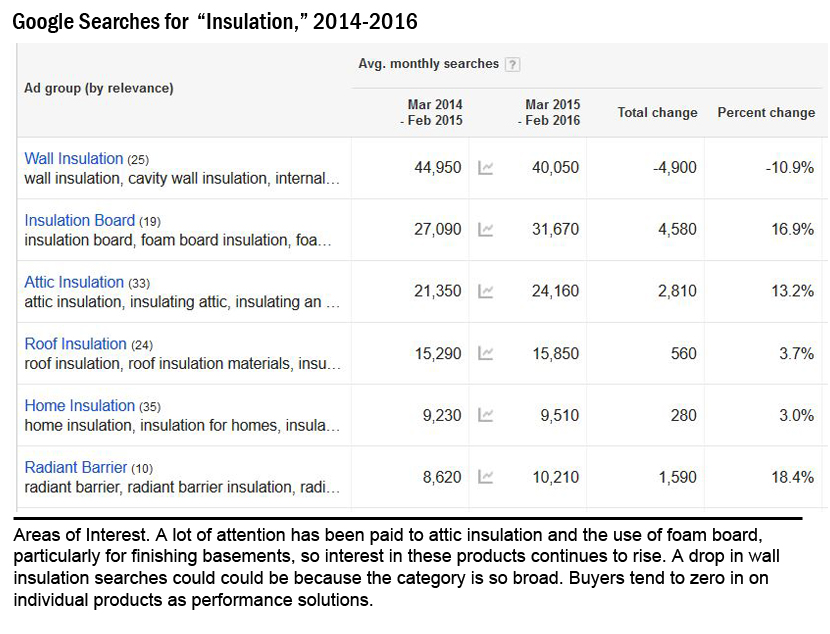
When we analyze Google keyword searches related to home construction, we find a distinct hierarchy of search density. The search begins with a precise product brand, proceeds to well-known categories of building materials, such as insulation, and quickly drops off from there into a few hundred searches a month for terms such as “house system” (590 searches a month with no growth in past 2 years).
Not to belabor the point, but consumer awareness of terms such as “performance home,” or “high-performance home” are almost never used in a search. That doesn’t mean these are “dead” terms, but rather that they have undeveloped potential for upward mobility. I’m not saying that to be flippant. We have found that when a term is unknown to search engines, it’s sometimes much easier to build it as a micro-brand that can attain the No. 1 SEO spot swiftly.
Brand recognition works like this. A consumer who’s open to new technology, looking for a wifi thermostat, doesn’t type in “wifi thermostat.” He or she types in “Honeywell wifi thermostat.” In fact, searches for these new thermostats exceed searches for the next four keyword groupings combined: “wireless thermostat”, “best thermostat” and “home thermostat”. That’s highly effective branding, sure, but it also reveals something deeper about consumer psychology with regard to home performance.
Beyond the “Magic Bullet” Perspective
The thermostat example suggests that smart buyers ARE looking deeper at home performance, but they see products as “magic bullets”—standalone solutions, not parts in a bigger system. This view persists, despite stoic efforts by manufacturers to educate and inform buyers about the importance of system thinking.
This lack of building science understanding in the consumer sphere may frustrate manufacturers, but it actually gives building professionals an opening. It means that there’s still a “gray area” in which trade pros can “push” toward better performance in the new home planning process.
By asking key questions, builders can steer a project toward higher performance and upgraded systems.
For example, in the case of insulation, the contractor might talk to the buyer about how insulation works in conjunction with window flashing, sill plates, caulking and sealants. Many manufacturers have this type of ready-made documentation available online. For example Owens Corning offers a step-by-step guide to “top of the roof” home insulation systems.
Today, the technology and know-how exists to take graywater from washing machines and showers—as well as rainwater collected from roofs—and use that water to flush toilets and irrigate landscapes. That same water can be brought back into the house, treated, and used yet again. It makes a lot of sense and saves a lot of water, so why isn’t it happening, or even mandated, everywhere?
“All water reuse scenarios are doable, and most of them are covered by the current code,” says Doug Pushard, founder of HarvestH2o and a designer of residential water management systems. “However, there are some holes—the codes have not been integrated. The rainwater code was driven by the American Rainwater Catchment Systems Association, and the graywater code came from states doing it and publishing best practices.”
An example of where adoption gets tricky is mixing graywater and rainwater in the same tank.
“This practice is not yet covered in the codes,” Pushard notes.”The purification is almost identical, but I have a feeling when I go to do my first one this year in Santa Fe, they will not allow the mixing of these waters. I will have to have two tanks and two filtration systems.”
That adds up to extra costs for homeowners, he explains, and slower market penetration.
Builder Kim Shanahan, executive officer of the Santa Fe Area Home Builders Association, is at the forefront of water conservation efforts in the water-conscious city. Because Santa Fe adopted certain codes, the municipality is poised to take advantage of water-saving reuse. “We are going to be allowed to bring water back into the house,” he says. “We adopted 2012 UPC and UMC Building Codes, as well as some chapters of the code that the State of New Mexico hasn’t even adopted.”
The upshot is that the municipality can bring water back into the house and reuse that water for toilet flushing and washing. “It’s not unique to Santa Fe,” Shanahan reminds. “Anyone using 2012 UPC and UMC Codes in their entirety can do this.”
The code is quite strict. It stipulates, for example, that the water being brought back in the house, even for use in toilets, be “potable,” ostensibly to protect pets or kids who happen to dip into that toilet water.
Shanahan says even this high bar can be reached, however: “We know we can treat water that has come back in the house to this higher standard than the required level, and we have the filtration and UV technology to do this. It is the future for homes: net zero energy, net zero water.”

Bill Roth, president of Modern Design + Construction in Santa Fe., N.M., has been working on graywater systems for 10 years: “We don’t do capture systems, just distribution systems,” he says. “You take the water out of the house and to various locations. These systems aren’t bombproof, but they don’t have any moving parts, and you aren’t treating or storing it.” In the application shown here, Roth collected the water from all the fixtures of a home, and ran it via 2-inch pipe to two distribution areas in the yard. He used the calculations provided by the 2012 plumbing codes for minimum side yard capture area.
Back in the mid-nineties, I remember meeting building scientist Joe Romm. He was working on some research about how daylight affected office workers. The idea seemed radical then, but not anymore. Numerous studies and projects have proven that a bright, comfortable environment has measurable, positive effects on human behavior. Here’s just one example. A utility—Penn Power & Light—upgraded buildings to make them more comfortable, with an emphasis on daylighting. They reported the following measurable effects on employee behavior (This and other studies are summarized HERE):
The Home Equation
Home builders, remodelers and home architects have begun to apply these same principles to home design and renovation. It’s not like this is something homeowners never thought about. Window walls have been popular for decades. Few homeowners would say they wish their home had LESS natural lighting. Just the opposite.
It’s not just the glass in a home that determines the comfort and overall impact of the indoor environment. What’s needed is something called an integrated design approach. In a nutshell, this means thinking through what life will be like inside this home on many levels. Also called Whole Building Design, this can sound like a daunting task: “providing the strategies to achieve a true high-performance building: one that is cost-effective over its entire life cycle, safe, secure, accessible, flexible, aesthetic, productive, and sustainable.” (Source HERE).
Fortunately, the science of building with ample glass has improved dramatically. Not only have the window glazings themselves become much more efficient, new products offer fiberglass frames are naturally resistant to heat transfer. On top of this, the whole process of installing windows is now supported by flashing and sealing systems that integrate with high-tech housewraps and rigid foam panels. The products and knowledge you need to make homes more livable are readily available. The only thing you’re lacking is some design inspiration. With that in mind, I’ve selected some of the very best daylight-friendly interior designs from our annual Green Home of the Year Awards program.
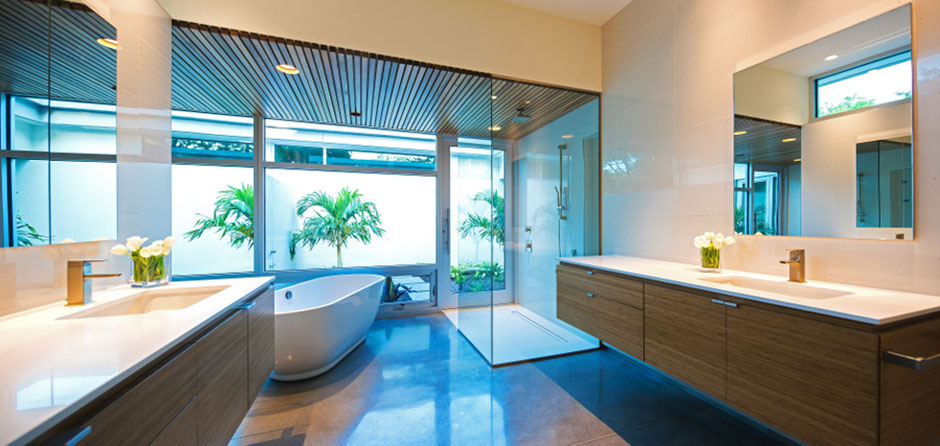
Project: Lotus on Orange
Builder:Josh Wynne Construction
Location: Sarasota, FL
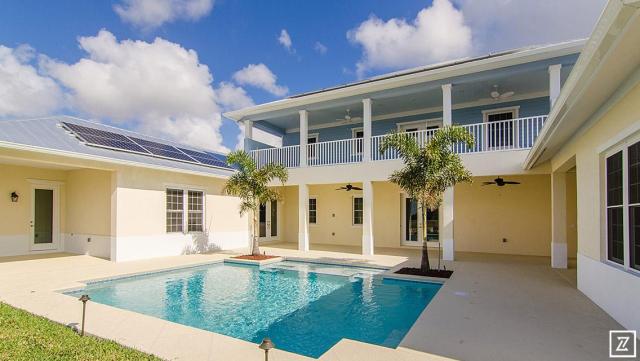
Project: Grand Cayman at Westcliffe Estates
Builder: Homecrete Homes/Greenergy Communities
Location: Port St Lucie, FL

Project: Curacao at the Reserve at Lake Washington
Builder: LifeStyle Homes, Inc.
Location: Melbourne, Florida

Project: My House Design
Builder: Build Team, Surrey
Location: Coquitlam, BC, Canada
Basement repair is a booming business in the United States. There’s even a national trade association –the National Foundation Repair Association (NFRA)–where foundation fixers can compare notes and hold annual conferences.
That’s because perfectly planned and installed dry concrete basements are tricky. Get it wrong, and that below-grade space could cost you thousands in repair and maintenance down the road. In worst case scenarios, it could even end up making your home “unsellable” — as happened to a neighbor of mine here in Maine, whose chronically leaking basement led to a massive black mold problem.
Whether you’re building new, or hoping to turn an existing basement into occupied space, you need to understand the science of dry basement construction. It’s always better to do the job right the first time. But if you don’t have that option, we’ll also look at remediation. How do you upgrade or repair an older foundation?
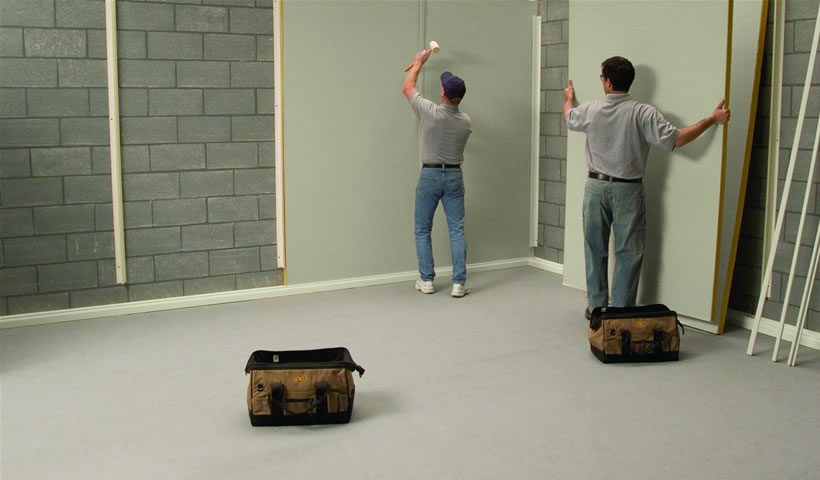
I’m going to touch on basement finishing systems in this article, but that’s not my focus. That’s the REWARD for getting your basement space dry and ready. Even some of the best finishing systems, such as this one from Owens Corning, cannot compensate for a leaking foundation.
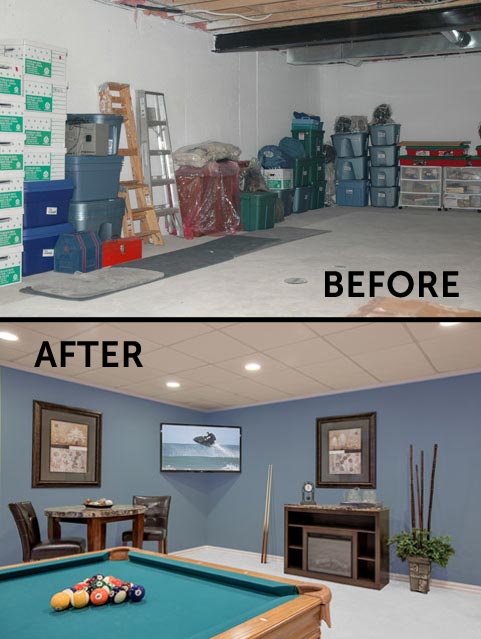
The Payoff. Prepping a basement properly has its rewards, as you can see from this successful project. Image courtesy of Owens Corning® Basement Finishing Systems.
Construction: Multiple Lines of Defense
Site. If you have the option, build on top of a hill. Short of that, identify a spot where the land slopes away in most directions, not a quaint valley between two hills. Ideally, the soil in the vicinity will be well drained and sandy. Often, of course, this is not the case, so you have to make do with what you have. One situation that’s tricky is building on the side of a hill. Although there are a lot of energy benefits to earth bermed construction of this type, you must aggressively manage water flow on the rear (uphill) side of the house.
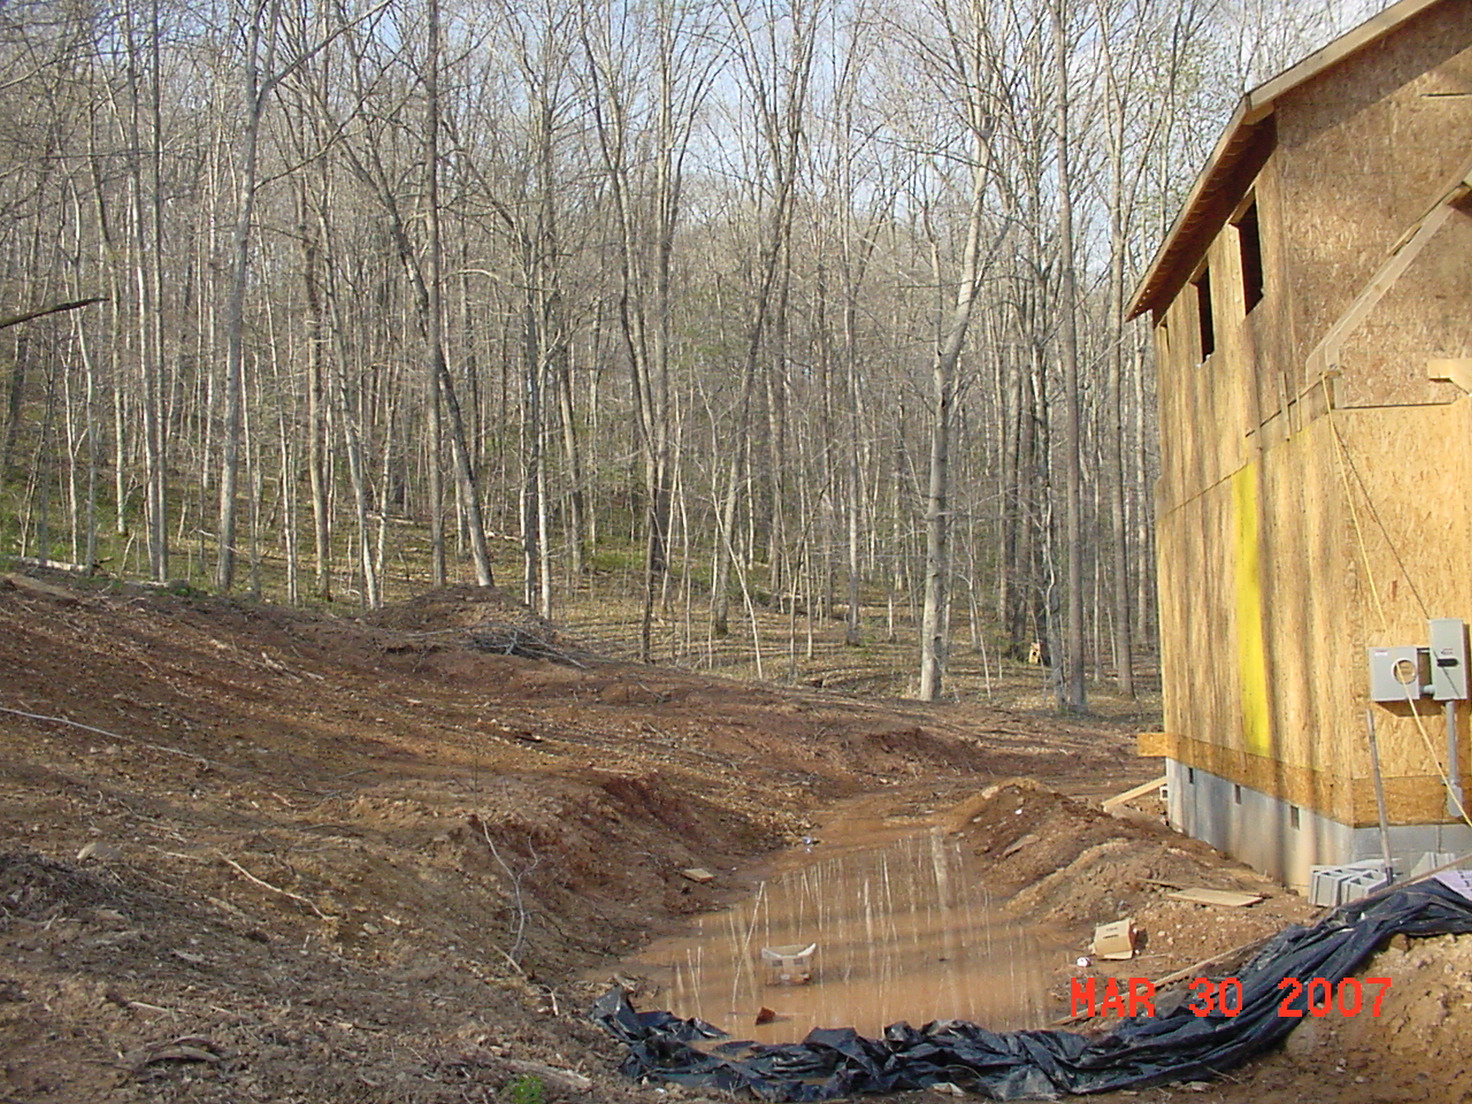
Poor Drainage. Note the water collecting on the uphill side of this home. This could spell basement trouble. If the builder had trenched higher up the hill and diverted water, the problem could have been avoided.
When it rains, or snow melts, water can run downhill both above and below the surface, and build up a huge “hydrostatic” pressure on your concrete wall. Even if your wall is made with high strength concrete, it may still “wick” water through to the interior. Concrete is porous, so any flaw in the waterproofing will become immediately apparent.
The solution is primitive, but effective. Divert the water BEFORE it reaches your home, by digging trenches in the area above the house. Use storm drains or other water management to send the water to either side of the house, where it can pass peacefully. This doesn’t mean you can ignore the construction details (below), but it removes a major threat to your dry basement.
Old School Rules Still Apply
The best method for keeping basements dry hasn’t changed much over the years. It’s a low-tech method of keeping water from collecting against the underground concrete. Why do we care about this? Contrary to what a lot of people think, concrete is not naturally waterproof. To the contrary, it absorbs water in what is called capillary wicking. Water moves from wet areas to dry areas. This is why poorly planned finished basements sometimes fail. Water gets trapped behind an insulate wall, where mold and mildew can grow.
The goal is to keep water away from the concrete as much as possible. As you see from the illustration below, this generally means creating a naturally draining system. A gently sloping grade of relatively impermeable clay soil carries most water away from the building. Water that does get through quickly passes through the gravel layer next to the wall, to be carried away by a drainage system at the footer level. Another nice extra step to take is to add a waterproof barrier between the vertical wall and the concrete footing. A lot of capillary wicking happens right where these two sections meet.
Time Tested. The “tried and true” method of preparing a concrete basement wall is shown here. Grading away from the structure is essential, and the clay soils are less permeable than gravel, directing water where it won’t collect and penetrate concrete walls.
Waterproofing. Coatings and Admixtures
The last defense of your foundation is waterproofing. In theory, you should never need waterproofing, with a well-designed basement. But soils change over time, and there’s always the possibility of an unusual weather event that overwhelms your normal drainage. Joe Lstiburek, a building scientist who works closely with the Department of Energy, is not a big fan of waterproofing. He says it can be scratched during backfill, or simply degrade over time, so shouldn’t be relied upon.
That doesn’t mean you should skip the waterproofing, of course. It simply reminds you that waterproofing is really an emergency backup for your well-designed system. Don’t think of it like a pool liner. There are many waterproofing products available, each with different chemical properties and claims. Look for products with a “life of the structure” warranty, such as HydroStop BarrierGuard Waterproofing. Of course, if you don’t have access to the exterior of your foundation, your waterproofing options will be limited. I would NOT recommend coating the interior of your basement walls with waterproofing. If you do so, you could end up trapping moisture inside the concrete. Imagine the reaction of that wet concrete to the first winter freeze (assuming you’re in a cold zone). It could literally shatter, as the water expands by 9 percent.
Another relatively new waterproofing approach worth considering is the addition of certain “admixtures” to the concrete itself, to make it less permeable. Concrete experts recommend hydrophilic crystalline admixtures. These compounds are primarily used by architects on big commercial projects, but if I were building a home in a wet area or near the ocean, I’d definitely consider them. For example, there’s a brand called MasterLife 300D from BASF that the trades seem to like.
Existing Homes. Taking Control
Say you want to upgrade an existing basement to livable space, but you’re not sure it was built with proper drainage. What are your options? Another pre-emptive water retrofit for managing water would be to install an interior perimeter drain system underneath your basement slab. This can be a fairly expensive process. Typically, you will remove part of the basement floor, bury a perforated pipe that carries water to a sump pump.
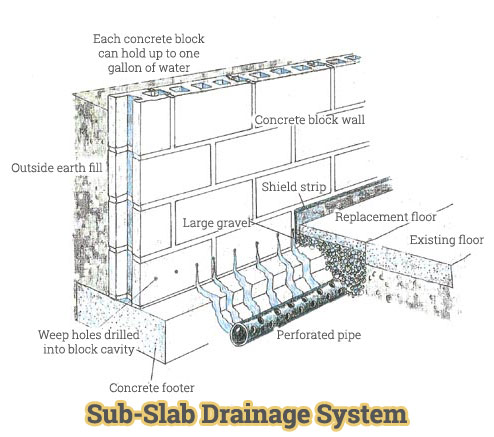
Wet Wall Fix. This retrofit method requires digging up part of your old floor and putting in drainage pipes. Image courtesy of http://www.alldryofohio.com.
French Drain. Another, somewhat less intrusive method of retrofitting drainage is the so-called French drain. Image courtesy of basementsystemsusa.com.
Insulating the Basement
Once you’re certain the basement will stay dry, you’re ready for the REWARD—turning that unused space into comfortable living area. There’s no single “best” way to do this. The key principles to keep in mind, however, is that typically you are applying vapor barriers on the outside of the foundation, trying to keep water out. If you’re building new, you may have the luxury of insulating the exterior with rigid foam (after waterproofing the walls, top of the wall and footer-wall connection).
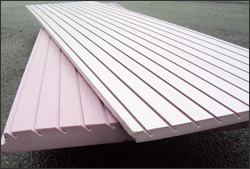
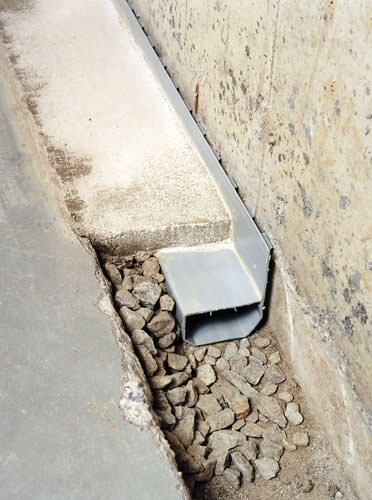
FOAMULAR® Pink-Drain® extruded polystyrene (XPS) foam insulation has integral water drainage channels that carry water away from the wall.
Even so, you will probably want to insulate interior walls, because if they’re cold at all, they could form moisture when contacting warm indoor air. The same technique will apply to insulating foundation interiors in existing homes. If you do decide on exterior insulating, you may want to install some of the new self-draining foam boards.
The best way to do this, according this best practices guide, prepared by Building Science Press, is to apply rigid, or semi-rigid insulation, rather than products that have kraft paper facings or any kind of vapor barrier. Interior walls need to be able to “sweat.”
Certain brands of rigid board, such as FOAMULAR® XPS and the Owens Corning® Basement Insulation System (shown) are specially formulated to allow SOME moisture to pass through. There’s nothing organic in these materials, so no place for mold to get a foothold.
Keep in mind that even in a good installation, basements can develop high humidity. Most experts recommend having a dehumidifier with automatic sensor that keeps the space at around 60% relative humidity. The better insulated and waterproofed your foundation walls, of course, the less energy you will use on dehumidification. If you want to learn more about these devices, here’s a detailed analysis.
Semi-Rigid. Owens-Corning has formulated semi rigid fiberglass board insulation with a 20 perm vapor rating. This allows moisture to pass through rather than becoming trapped.
Durability Extras
In theory, if you’ve done your waterproofing homework, you should have no trapped water issue, no matter which insulation you choose. But extra precautions never go amiss. Maybe you have a record setting snowfall one year, and your system is overwhelmed enough that the concrete gets wet. What can you do to save your basement lair?
One good approach is to isolate surfaces—especially your floor, so it’s not in direct contact with concrete. You can find many products of this type, from special shimmed wood panels to free-floating carpet tiles. Keep in mind that any organic material, wood, bamboo, wool carpets can mold. Our recommendation would be to floor with something inert, such as ceramic tile, or a plastic-based system, such as ThermalDry Floor Tiles. You can always throw down an area rug, and remove it if trouble occurs.
For finished interior walls, drywall can be problematic. It’s susceptible to water damage. If used over foam board insulation, a drying gap is typically left between the drywall and the foam, using wooden furring strips or a full 2 x 4 wall structure. With the latter, a small gap is typically left between the foam and the wall, to prevent moisture transfer to the wood. That’s because water tends to condense on the inside surface of the insulating material.
Water- and mold-resistant drywall types of drywall are essential for this kind of construction. Also, the contractor should end the drywall a few inches above the concrete slab, and cover the gap with a trim board, to keep water from wicking up from the floor. The alternative to drywall is a non-organic product, such as the Owens Corning system (shown) with fiberglass panels that are also removable.
The key to converting a basement from a damp and dingy space to a durable, comfortable part of your home is taming the risk of water intrusion. Know thy enemy, and give it someplace else to go, and you’ll never look back with regret.
From a building science perspective, three things define a home’s comfort level: moisture, temperature and noise.
Humans are highly adaptable to different climates, but much of that adaptability is technology enhanced. Without heating, warm clothes, and so on, we’re fairly fragile.
LiveScience notes that “people can live indefinitely in environments that range between roughly 40 °F and 95 °F (4 °C and 35 °C), if the latter temperature occurs at no more than 50 percent relative humidity.”
So basically we’ve got a 55 °F comfort window, and the closer we get to the outer “extremes” of that window, the more uncomfortable we are. Thus, a drafty home with excessive humidity (or, less commonly, dry air) can really mess with our happiness. Add in an unhealthy noise level, and you have a trifecta of invisible problems.
Fortunately, we now understand building science well enough to address each of these aspects of home comfort. A combination of good design, the right products and “systems” can solve them.
Controlling Moisture
Modern homes tend to be tightly built and insulated. That means that any moisture created inside the home is likely to be trapped for a while, unless there’s some mechanism to remove it. Dishwashers, showers, faucets, cooking and leaking ducts from clothes dryers are just some of the internal sources of moisture, along with human respiration (breathing) and perspiration. To remove moisture and other contaminants, building standards and codes now require a certain amount of mechanical ventilation₁ in new homes, typically between 40 and 70 cubic feet per minute.
Bathrooms are a major source of indoor humidity.
Unless you run your bath fans 24 hours a day (some fans have a lower speed setting for this purpose), they may not be adequate to remove enough moisture to get it down to a range that’s comfortable—yet not likely to result in mold or mildew. That’s especially true in high performance homes. According to a report by Building Science Corporation, that range should be around 60% RH in the summer, and somewhat lower in the winter.
To retard the migration of water vapor through the wall assembly, building codes also require “vapor retarders” in wall assemblies in some climates. The International Residential Code (IRC) defines vapor retarders according to their vapor permeance: Class I has ≤ 0.1 perm (essentially impermeable), Class II has from 0.1 to 1.0 perm (semi-impermeable) and Class III has from 1.0 to 10 perm (semi-permeable). Kraft paper, which usually faces insulation, is a Class II vapor retarder. Since the conditions in houses change with time, it would be interesting to have a vapor retarder that would change its vapor permeance based on the conditions: low permeance when the humidity is low and high permeability when humidity is higher. While innovation has produced sophisticated “smart” vapor retarders that adjust their resistance to moisture flow automatically, kraft paper also has this variable permeance.
In cold weather, moisture generated within the house can find its way to the attic and can damage insulation, rafters, roof deck and other materials. Roofing ventilation can remove the moisture with air entering the attic through soffit vents and leaving through a ridge vent along the top of the roof peak. A ventilating ridge vent removes hot, moist air from the attic.
Foundations can be a major source of humidity as well. The runoff from roofs and building surfaces needs to be collected using gutters and drained away from the foundation perimeter, and an impermeable layer should cover the ground adjacent to the house. Foundation walls and slabs should be carefully sealed on the outside to prevent moisture “wicking” into living spaces. A capillary break should also be installed over the top of the footing to control water rise. But equally important, moisture indoors has to be managed. Even if you’re using a basement finishing system, in several climates it’s still recommended to have a backup system such as a dehumidifier to divert excess moisture to a nearby drain.
The ventilation experts at ASHRAE note that simply opening a window or door to clear the air is an unreliable system at best: “Occupants tend to be rather poor ventilation sensors”, they note, “and cannot do a good job of determining whether the minimum ventilation rates are being met or not. For this reason, mechanical ventilation is preferable to windows or other systems that require occupant control or provide unpredictable amounts of ventilation.”
Your best bet to control moisture: build a house that allows vapor to exit slowly through walls, along with mechanical ventilation in bath and kitchen areas especially. Some products now include moisture sensors that will trigger them when humidity reaches a certain level. Soon, you’ll be able to tie them all together with the Internet of Things.
Temperature: Start with Leaky Windows
Perhaps the biggest complaint people have about older homes is their “draftiness”. Why are old homes so leaky? First, many of them contained no air sealing and no insulation whatsoever. Second, the mechanics of windows especially, leave large cavities on either side of the windows, which are often poorly sealed and uninsulated. Old windows have a giant empty space next to them that is often related to the “draftiness” you feel.
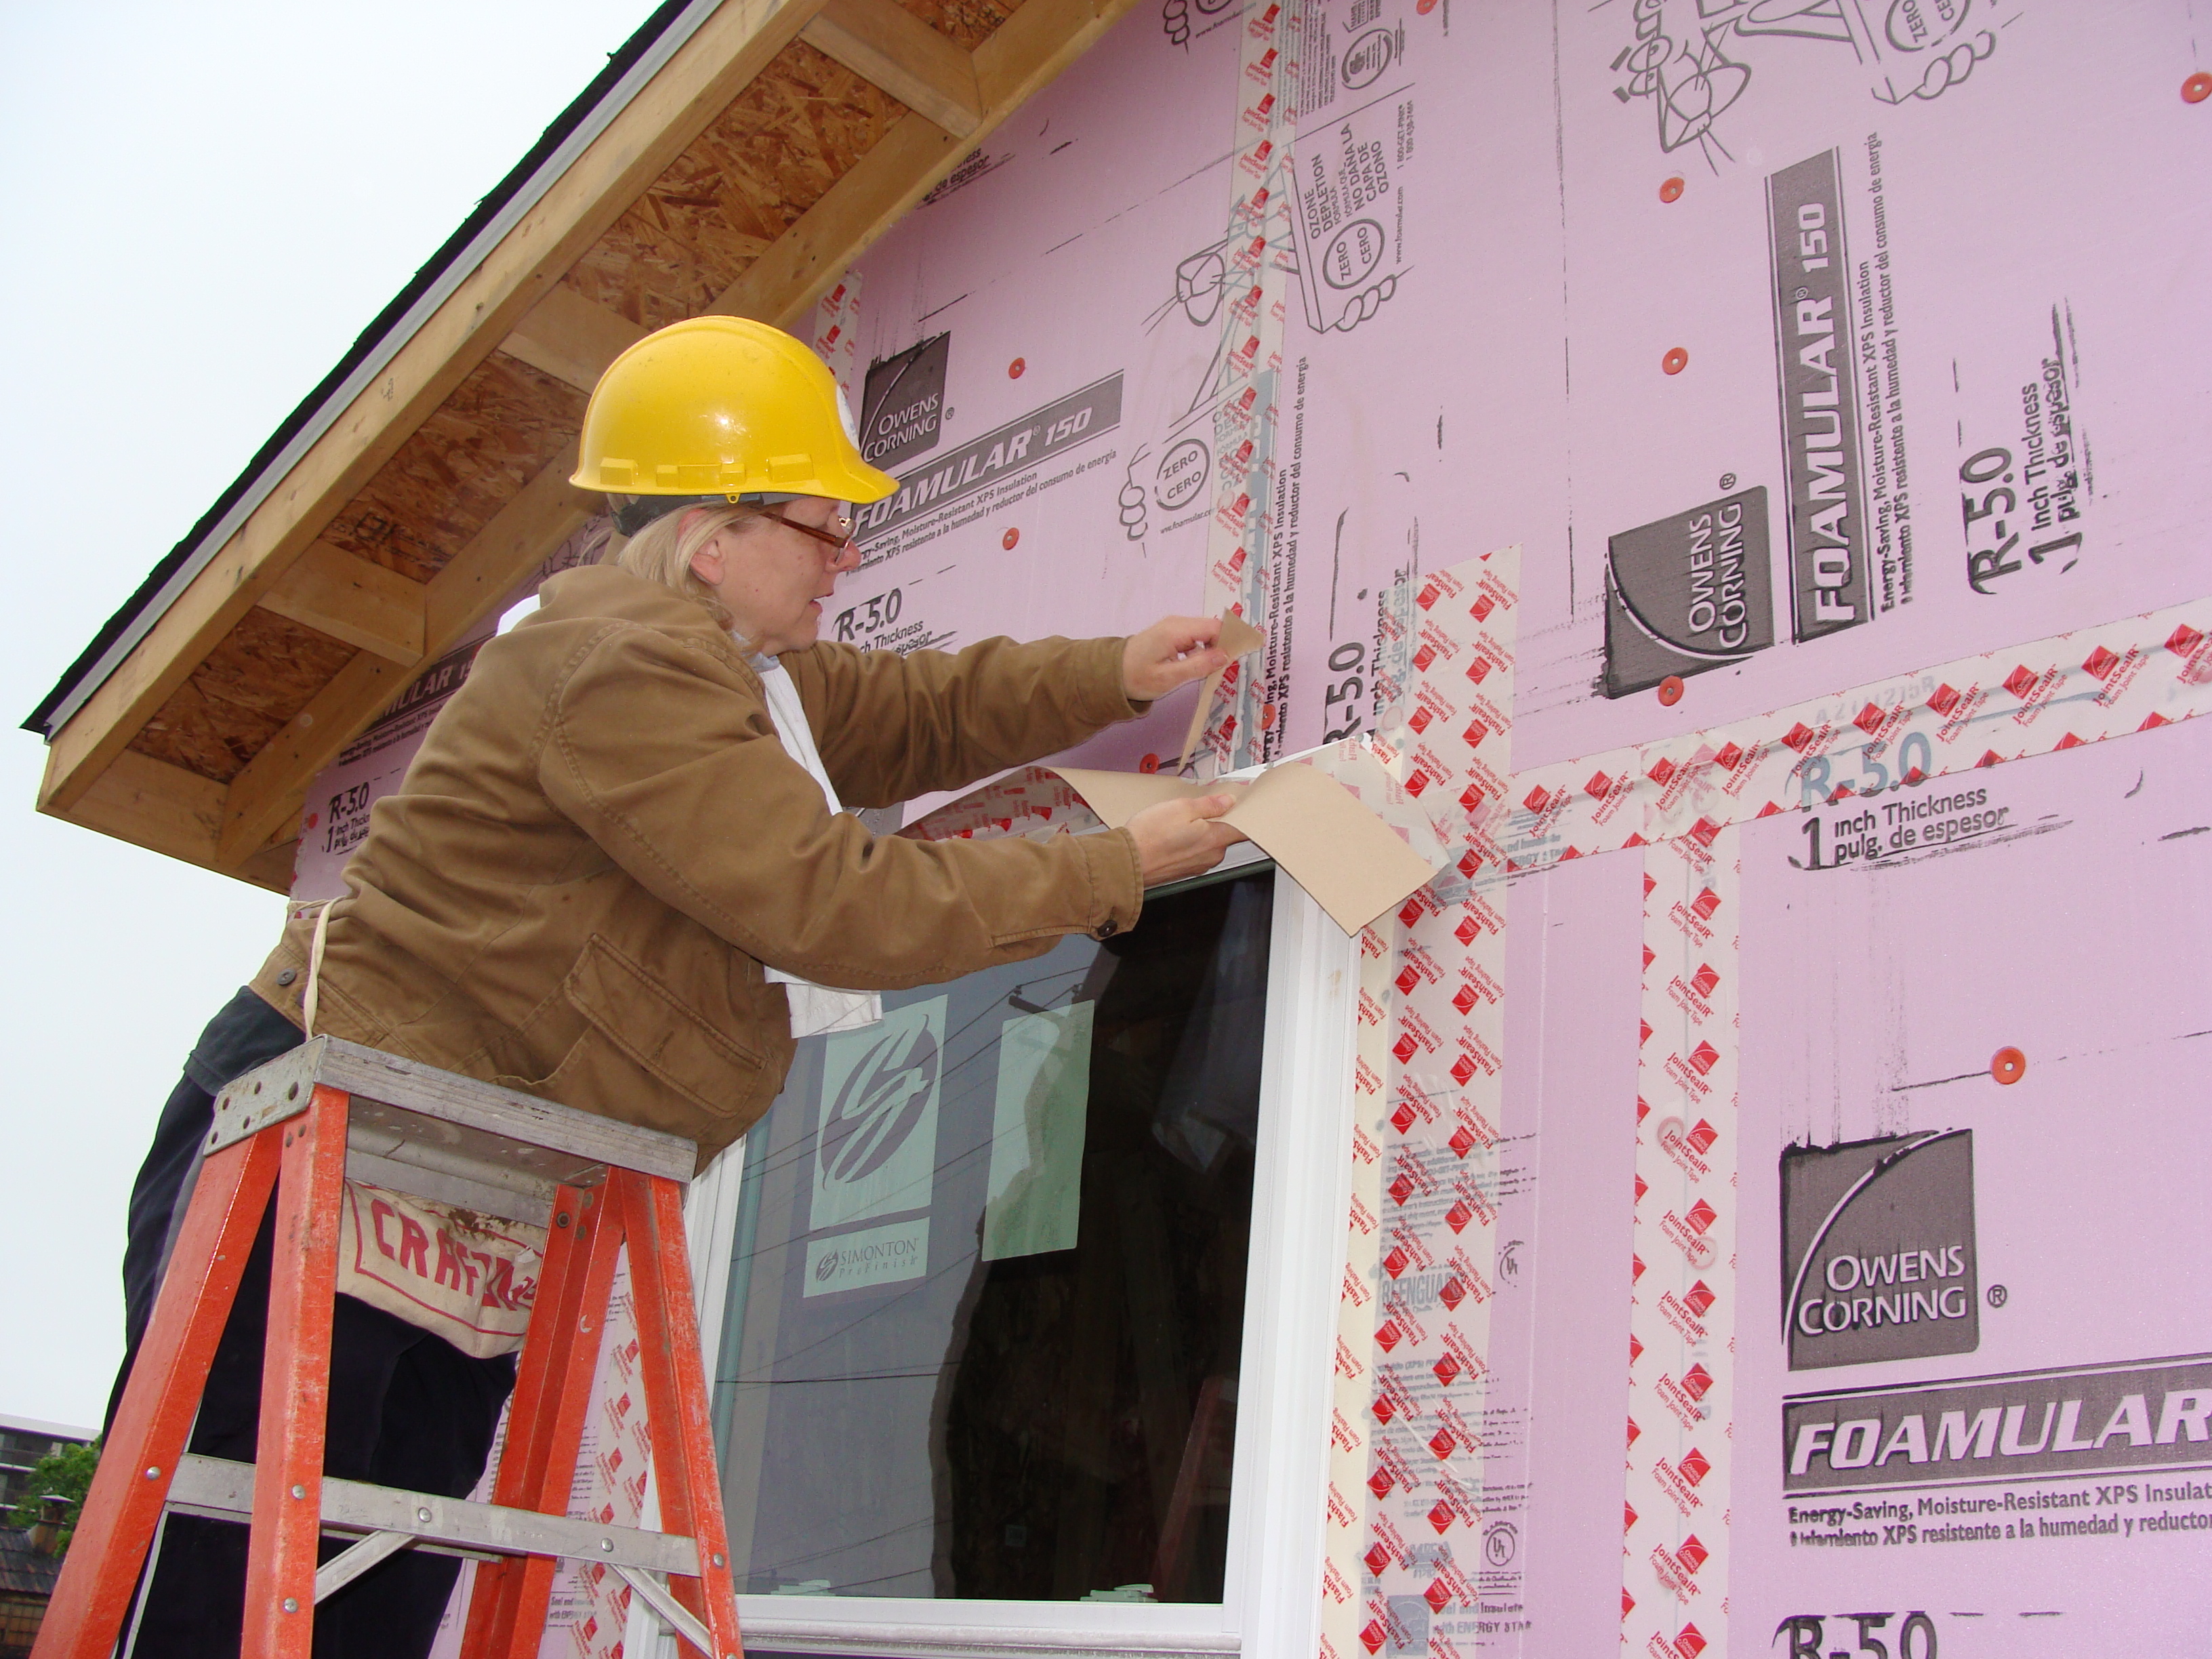
It makes sense then to start any temperature-control effort with windows and doors. The ideal solution is to replace counterweighted, single pane windows with new units that feature low-e or better insulated glass. When you do so, make sure to insulate the empty cavity next to the window. Before inserting the new window, use a self-stick flashing to seal all around the opening.
New self-stick flashings seal the window and complete the envelope, tying in to the home’s wrap system.
Fixing the (Other) Holes
Other major sources of unwanted drafts and temperature changes include doors, electrical outlets and light fixtures. Fortunately, affordable products are available to retrofit these problems. Door drafts can be solved with simple stick-on weatherproofing products. Insulating outlet covers go on behind faceplates to seal out drafts.
Door thresholds are often leaky. Adjustable sash sealers like this one from soundproofing.org also reduce sound transmission.
Attics—Add a Blanket
Insulating your unused attic space is a great next step in controlling draftiness in your home. Blown in products are highly effective, and create a blanket for your living spaces. If you use your attic for storage, at the very least, install an attic cap over your pull down stairs. Otherwise, an attic often acts as a chimney, especially if it’s vented, pulling warm air from the entire house.
Noise Pollution: What You Can Do
Unwanted noise is not just a nuisance. It’s also a health hazard. For example, a study by the National Institute of Health found a direct link between highway noise and human hypertension. The researchers noted that among the people they studied, those most affected by noise were the ones with older windows facing the street. They note that people opposed to constant, excessive noise levels between 45 and 65 decibels (a typical highway noise level) lose sleep, and also may experience changes in respiration, blood pressure, heart rate and body movements.
This type of noise pollution rarely gets enough attention. Most noise ordinances tend to focus on extremes—machinery and activity that causes spikes in noise levels, such as running power tools, heavy machinery, motorcycles or fireworks. These tend to be noise levels that can damage hearing. But some cities are beginning to respond to new research. Boston, for example, now restricts noise levels to 50 db between 11 p.m. and 7 a.m.
For home noise control, you want to look at the site first. What are the likeliest noise offenders? Is the house next to an airport, a train track or a fire station? Will highway noise be an issue? How important is noise deadening between rooms and floors?
Windows, Walls and Floors That Knock Down Noise
As with drafts, the first place to look when soundproofing is windows, assuming the source of noise pollution is coming from outside. Triple-paned glass are very effective, but these are expensive. Jeff Fullerton, a sound engineer with Acentech, Inc., argues that double-paned windows with gas filled cavity are almost as good, and much more affordable. Insulate and seal them as instructed above for drafts, and you’ll also be addressing sound.
Once you have windows squared away, look at wall insulation. Are cavities filled completely? Combined air sealing and insulation have the added advantage of improving soundproofing at the same time they’re sealing out drafts.
If you have a major soundproofing problem, such as a train track outside your window, or you want to be able to use a home theater late at night without waking anyone in the house, various soundproofing systems are available. If you are a contractor or want to try framing a quiet space yourself, this system includes framing details for corners, headers and other key points in the wood frame where sound transmission can be reduced. These typically involve adding additional layers or types of insulation, and in some cases, extra drywall. If you want an idea how much sound you can control, this site allows you to listen to before/after recordings of soundproofed rooms.
Don’t Forget Ducts and Pipes
Unless managed carefully, ducts and plumbing can clatter and clank and carry sound throughout the home.
Ducts and (especially) hot water pipes in older homes often make themselves heard—loudly—as they heat and cool. If you can get at them, make sure they have room to move. Reposition them with hangers or wrap them in special insulated tubes, either foam or fiberglass, away from other surfaces. Insulating around them with fiberglass also may help control noise, but be sure to seal the duct seams first with special metallic tape. One key area to look at is the point where the furnace connects with the ductwork. You can install a special flexible connector at that point, so when the equipment kicks on or off, it doesn’t rattle through the house.
Insulating pipes is one way to stop the incessant rattling as they expand and contract in wall cavities.
Taking care of the big three issues in the home, new or old, will go a long way toward making it the livable, comfortable place that it should be.
₁ASHRAE Standard 62.2 is the national ventilation standard of design for all homes and up to three-story multifamily buildings.
Some energy-saving ideas from the 1970’s are much more viable now, thanks to new products and systems.
Often, good ideas, simply because they’ve been around for a while, are assumed to be less effective, or even obsolete. But many of the energy-saving principles of the solar homes of the Carter era actually have the potential to work even better today. That’s because insulating techniques, window glazings, and even window coverings have improved dramatically.
These techniques are not limited to new home construction. They apply whether you are starting from scratch on a new site, adding an addition, or dropping a modular home onto your lot.
Here’s a look at three “Old School” technologies that make perfect sense for modern construction. For this article, we’ll be looking primarily at cold-weather construction details, although some, such as earth berms and solar PV, have application in hot climates as well.
Earth Berm Upgrade
One of the problems with early attempts at partially buried, split or “bi-level” homes with livable basements was the near inevitability of moisture problems. The guideline has always been to steer water away from the basement, but new products offer a level of fail safe protection that wasn’t there before. The old way was to simply slap a coat of asphalt on concrete below-grade walls, and install a sump hole in the concrete floor of the basement as a backup plan for any seepage. But modern products such as synthetic drainage mats are far more foolproof than a thin layer of asphalt that will degrade over time.

This illustration shows a carefully planned earth berm for a modern home. New technologies offer better long-term moisture-proofing and energy performance. Image: www.themodernnatural.com.
That was then. Building science has improved, and you can now install concrete walls (still with good drainage in mind) that are protected by solid backup systems to keep water out for the life of the home. For an overview, here’s a guide designed for professional builders (See “Water Control Layer,” Section 1.2, page 12) that explains how to install and use high-tech drainage mats with rigid foam insulation to create durable, waterproof basement walls.
By combining this insulating technique with the natural insulating qualities of earth berming, you can save big bucks on a home’s long-term energy usage. As an interesting side note, earth berming also makes a very effective sound barrier. A field study back in 2011 found that earth bermed walls worked better than concrete at reducing noise pollution, primarily because the earth walls can be built at an angle that deflects noise, whereas concrete walls tend to be vertical.
Passive Solar: New Tools
When passive solar first hit its niche in the 1970’s, the best option for overall energy performance was dual glazing and manual, rigid foam panels. Sure, you could get some great heat gain during the day, but unless you swung down the foam panels at night, you would lose all the gained heat, for a net energy loss. That’s asking a lot of consistent behavior from creatures not known for consistency (humans).
Technology solved this problem with low-e glazing. Equip that window-wall with low-e double-glazed windows, and even if you have no window coverings (in some cold climates), you end up with an energy wash. No energy gain, but you’ve hit neutral. This is where new technologies come in.
Three advances (below), especially when used in concert in a well insulated house, greatly increase the energy-efficiency potential of passive solar. Achieving Passive House level wall R-values can be achieved with conventional materials. At the REACH Community Development Orchards at Orenco project, for example, here’s how they hit that mark:
“While typical walls usually have 6″ stud cavities filled with batt insulation, the walls at Orchards will have 10″ stud cavities filled with blown-in fiberglass insulation as well as a layer of exterior rigid insulation.”
Passive House experts also recommend specific window frame insulating values and other details. But for simplicity, focus first on the big three:
Window Sealing Systems. Put your hand next to a window in an old house. If you feel a draft, chances are it’s coming from the area around the window, not the glass itself. We have a much better sense of the importance of air sealing around windows, and new products such as sealing tapes that make it easy to get a perfect seal.
Advanced Glazing. Newer windows, with argon-filled cavities and/or triple-glazings shift the energy equation. Now you’re actually retaining more solar heating than you’re losing over the cold winter nights. The next step seals the deal.
Automated, Insulated Blinds. Few of us have a lifestyle or the discipline to lower and close window insulation twice a day, every day, to save energy. But affordable automated systems are now available that take over this chore. With these technologies combined, passive solar window walls and south orientation look a lot more promising for modern homes and additions.
Roof-Top PV: Blending In
Some people don’t like the look of traditional photovoltaic panels. Their objections don’t have to be a deal breaker. Solar now comes in many styles that blend with roofing. These products, called Building Integrated Photovoltaics (BIPV) used to be reserved for commercial projects, but they’re finding a growing market among homeowners.
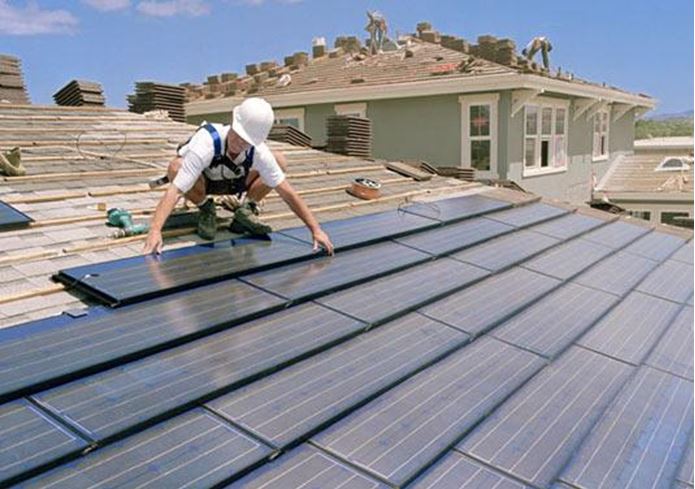
Low PV Profile. Building integrated solar panels blend in better with traditional rooflines in the neighborhood. Image: Flickr (Creative Commons).
BIPVs are fairly new in the residential sector, and there are a few special things to consider when putting one on a traditionally built truss-framed roof.
Don’t let old ideas about passive solar, earth-bermed and rooftop solar turn you off to these time-tested, better-than-ever technologies. Add the right modern ingredients. And you can put them to work saving money over the long lifespan of your next home or addition.