Basement repair is a booming business in the United States. There’s even a national trade association –the National Foundation Repair Association (NFRA)–where foundation fixers can compare notes and hold annual conferences.
That’s because perfectly planned and installed dry concrete basements are tricky. Get it wrong, and that below-grade space could cost you thousands in repair and maintenance down the road. In worst case scenarios, it could even end up making your home “unsellable” — as happened to a neighbor of mine here in Maine, whose chronically leaking basement led to a massive black mold problem.
Whether you’re building new, or hoping to turn an existing basement into occupied space, you need to understand the science of dry basement construction. It’s always better to do the job right the first time. But if you don’t have that option, we’ll also look at remediation. How do you upgrade or repair an older foundation?
I’m going to touch on basement finishing systems in this article, but that’s not my focus. That’s the REWARD for getting your basement space dry and ready. Even some of the best finishing systems, such as this one from Owens Corning, cannot compensate for a leaking foundation.
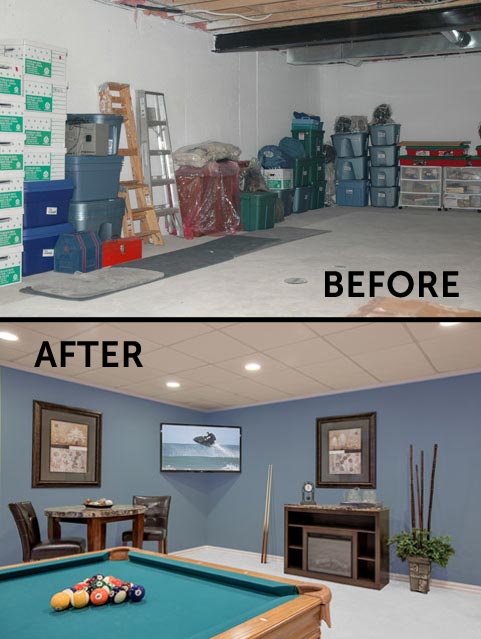
The Payoff. Prepping a basement properly has its rewards, as you can see from this successful project. Image courtesy of Owens Corning® Basement Finishing Systems.
Construction: Multiple Lines of Defense
Site. If you have the option, build on top of a hill. Short of that, identify a spot where the land slopes away in most directions, not a quaint valley between two hills. Ideally, the soil in the vicinity will be well drained and sandy. Often, of course, this is not the case, so you have to make do with what you have. One situation that’s tricky is building on the side of a hill. Although there are a lot of energy benefits to earth bermed construction of this type, you must aggressively manage water flow on the rear (uphill) side of the house.
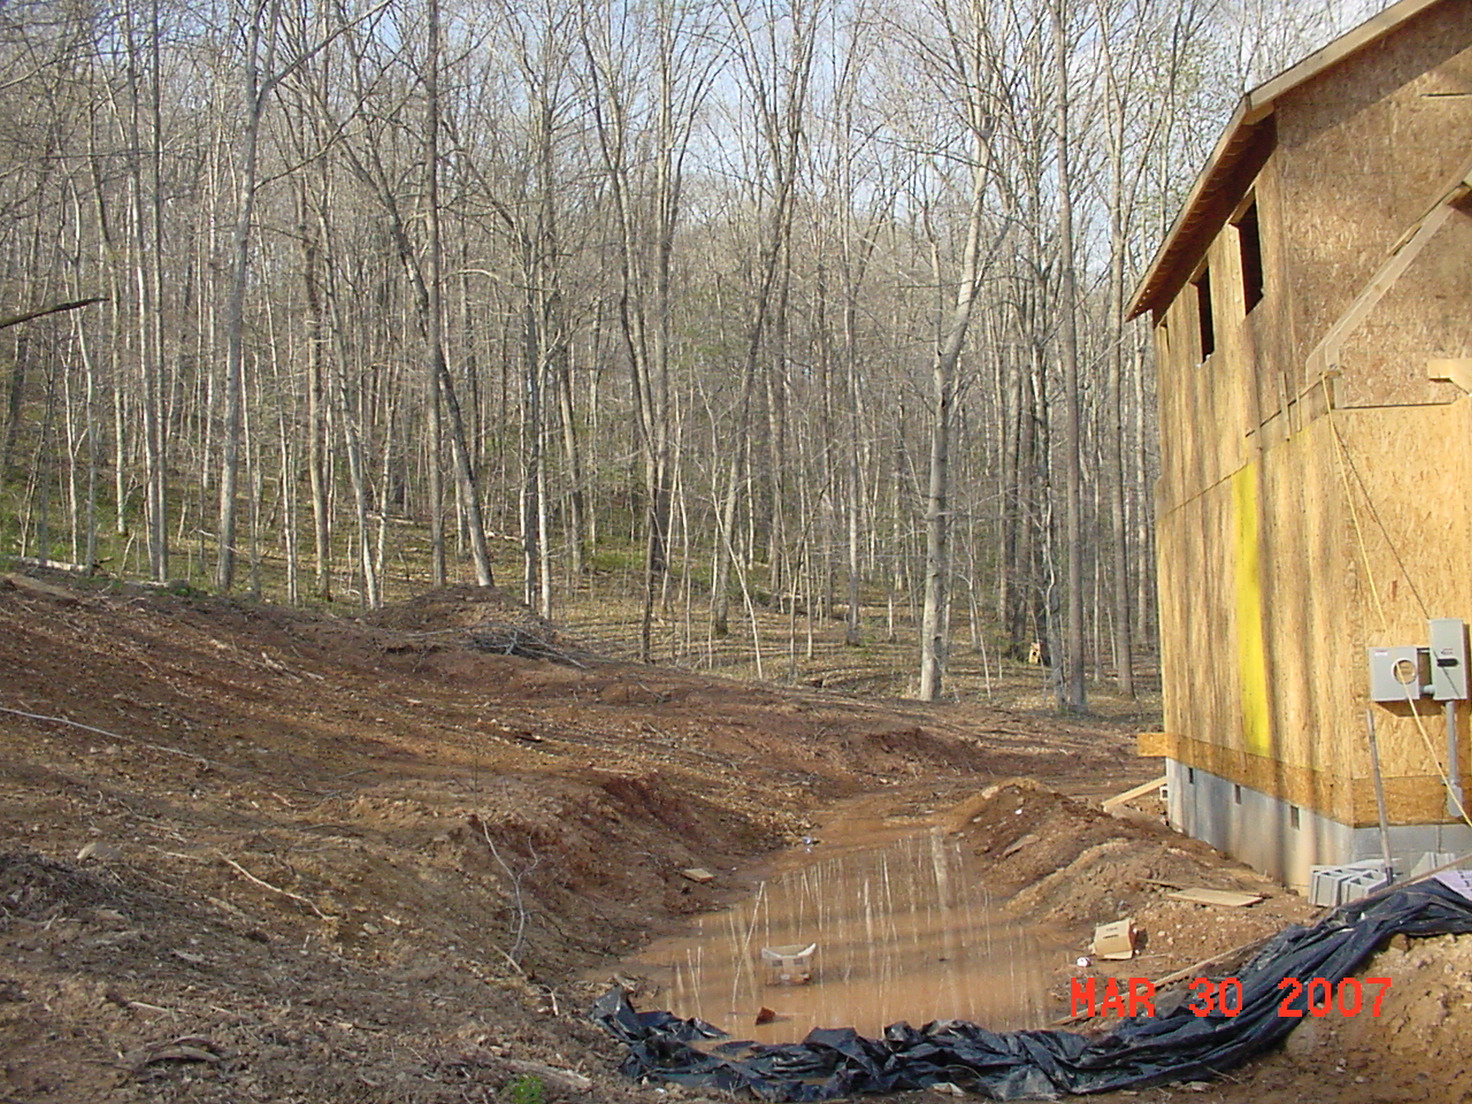
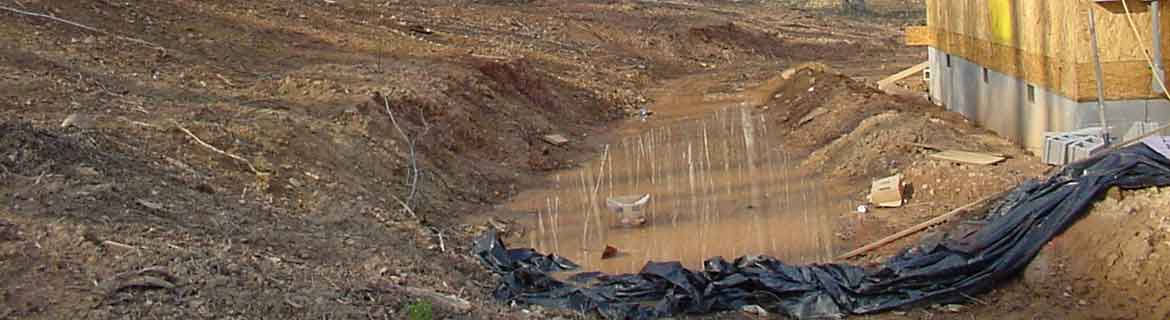
Poor Drainage. Note the water collecting on the uphill side of this home. This could spell basement trouble. If the builder had trenched higher up the hill and diverted water, the problem could have been avoided.
When it rains, or snow melts, water can run downhill both above and below the surface, and build up a huge “hydrostatic” pressure on your concrete wall. Even if your wall is made with high strength concrete, it may still “wick” water through to the interior. Concrete is porous, so any flaw in the waterproofing will become immediately apparent.
The solution is primitive, but effective. Divert the water BEFORE it reaches your home, by digging trenches in the area above the house. Use storm drains or other water management to send the water to either side of the house, where it can pass peacefully. This doesn’t mean you can ignore the construction details (below), but it removes a major threat to your dry basement.
Old School Rules Still Apply
The best method for keeping basements dry hasn’t changed much over the years. It’s a low-tech method of keeping water from collecting against the underground concrete. Why do we care about this? Contrary to what a lot of people think, concrete is not naturally waterproof. To the contrary, it absorbs water in what is called capillary wicking. Water moves from wet areas to dry areas. This is why poorly planned finished basements sometimes fail. Water gets trapped behind an insulate wall, where mold and mildew can grow.
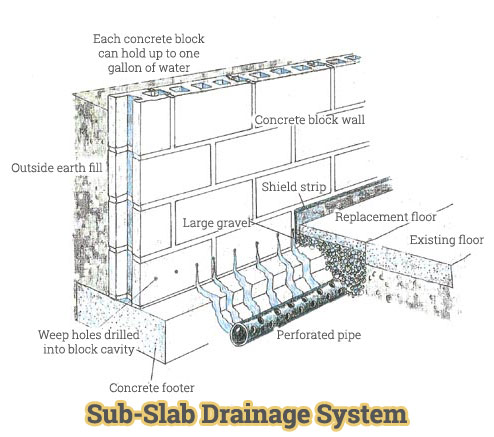
The goal is to keep water away from the concrete as much as possible. As you see from the illustration below, this generally means creating a naturally draining system. A gently sloping grade of relatively impermeable clay soil carries most water away from the building. Water that does get through quickly passes through the gravel layer next to the wall, to be carried away by a drainage system at the footer level. Another nice extra step to take is to add a waterproof barrier between the vertical wall and the concrete footing. A lot of capillary wicking happens right where these two sections meet.
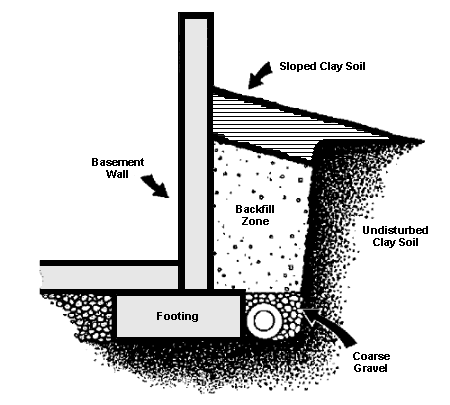
Time Tested. The “tried and true” method of preparing a concrete basement wall is shown here. Grading away from the structure is essential, and the clay soils are less permeable than gravel, directing water where it won’t collect and penetrate concrete walls.
Waterproofing. Coatings and Admixtures
The last defense of your foundation is waterproofing. In theory, you should never need waterproofing, with a well-designed basement. But soils change over time, and there’s always the possibility of an unusual weather event that overwhelms your normal drainage. Joe Lstiburek, a building scientist who works closely with the Department of Energy, is not a big fan of waterproofing. He says it can be scratched during backfill, or simply degrade over time, so shouldn’t be relied upon.
That doesn’t mean you should skip the waterproofing, of course. It simply reminds you that waterproofing is really an emergency backup for your well-designed system. Don’t think of it like a pool liner. There are many waterproofing products available, each with different chemical properties and claims. Look for products with a “life of the structure” warranty, such as HydroStop BarrierGuard Waterproofing. Of course, if you don’t have access to the exterior of your foundation, your waterproofing options will be limited. I would NOT recommend coating the interior of your basement walls with waterproofing. If you do so, you could end up trapping moisture inside the concrete. Imagine the reaction of that wet concrete to the first winter freeze (assuming you’re in a cold zone). It could literally shatter, as the water expands by 9 percent.
Another relatively new waterproofing approach worth considering is the addition of certain “admixtures” to the concrete itself, to make it less permeable. Concrete experts recommend hydrophilic crystalline admixtures. These compounds are primarily used by architects on big commercial projects, but if I were building a home in a wet area or near the ocean, I’d definitely consider them. For example, there’s a brand called MasterLife 300D from BASF that the trades seem to like.
Existing Homes. Taking Control
Say you want to upgrade an existing basement to livable space, but you’re not sure it was built with proper drainage. What are your options? Another pre-emptive water retrofit for managing water would be to install an interior perimeter drain system underneath your basement slab. This can be a fairly expensive process. Typically, you will remove part of the basement floor, bury a perforated pipe that carries water to a sump pump.
Wet Wall Fix. This retrofit method requires digging up part of your old floor and putting in drainage pipes. Image courtesy of http://www.alldryofohio.com.
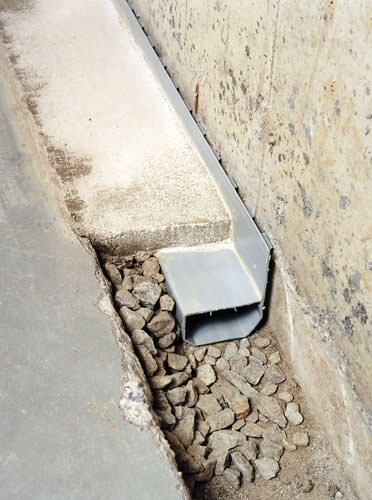
French Drain. Another, somewhat less intrusive method of retrofitting drainage is the so-called French drain. Image courtesy of basementsystemsusa.com.
Insulating the Basement
Once you’re certain the basement will stay dry, you’re ready for the REWARD—turning that unused space into comfortable living area. There’s no single “best” way to do this. The key principles to keep in mind, however, is that typically you are applying vapor barriers on the outside of the foundation, trying to keep water out. If you’re building new, you may have the luxury of insulating the exterior with rigid foam (after waterproofing the walls, top of the wall and footer-wall connection).
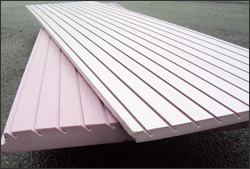
FOAMULAR® Pink-Drain® extruded polystyrene (XPS) foam insulation has integral water drainage channels that carry water away from the wall.
Even so, you will probably want to insulate interior walls, because if they’re cold at all, they could form moisture when contacting warm indoor air. The same technique will apply to insulating foundation interiors in existing homes. If you do decide on exterior insulating, you may want to install some of the new self-draining foam boards.
The best way to do this, according this best practices guide, prepared by Building Science Press, is to apply rigid, or semi-rigid insulation, rather than products that have kraft paper facings or any kind of vapor barrier. Interior walls need to be able to “sweat.”
Certain brands of rigid board, such as FOAMULAR® XPS and the Owens Corning® Basement Insulation System (shown) are specially formulated to allow SOME moisture to pass through. There’s nothing organic in these materials, so no place for mold to get a foothold.
Keep in mind that even in a good installation, basements can develop high humidity. Most experts recommend having a dehumidifier with automatic sensor that keeps the space at around 60% relative humidity. The better insulated and waterproofed your foundation walls, of course, the less energy you will use on dehumidification. If you want to learn more about these devices, here’s a detailed analysis.
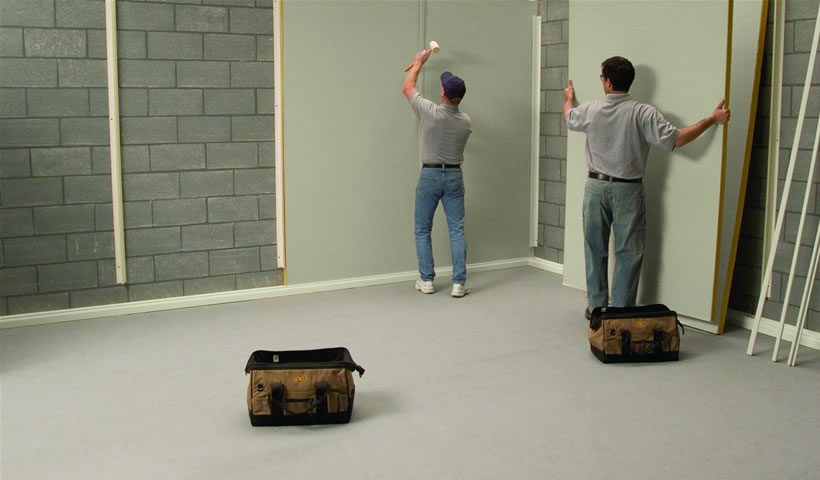
Semi-Rigid. Owens-Corning has formulated semi rigid fiberglass board insulation with a 20 perm vapor rating. This allows moisture to pass through rather than becoming trapped.
Durability Extras
In theory, if you’ve done your waterproofing homework, you should have no trapped water issue, no matter which insulation you choose. But extra precautions never go amiss. Maybe you have a record setting snowfall one year, and your system is overwhelmed enough that the concrete gets wet. What can you do to save your basement lair?
One good approach is to isolate surfaces—especially your floor, so it’s not in direct contact with concrete. You can find many products of this type, from special shimmed wood panels to free-floating carpet tiles. Keep in mind that any organic material, wood, bamboo, wool carpets can mold. Our recommendation would be to floor with something inert, such as ceramic tile, or a plastic-based system, such as ThermalDry Floor Tiles. You can always throw down an area rug, and remove it if trouble occurs.
For finished interior walls, drywall can be problematic. It’s susceptible to water damage. If used over foam board insulation, a drying gap is typically left between the drywall and the foam, using wooden furring strips or a full 2 x 4 wall structure. With the latter, a small gap is typically left between the foam and the wall, to prevent moisture transfer to the wood. That’s because water tends to condense on the inside surface of the insulating material.
Water- and mold-resistant drywall types of drywall are essential for this kind of construction. Also, the contractor should end the drywall a few inches above the concrete slab, and cover the gap with a trim board, to keep water from wicking up from the floor. The alternative to drywall is a non-organic product, such as the Owens Corning system (shown) with fiberglass panels that are also removable.
The key to converting a basement from a damp and dingy space to a durable, comfortable part of your home is taming the risk of water intrusion. Know thy enemy, and give it someplace else to go, and you’ll never look back with regret.